Blog

Do You Want Extra Entries for the Bosch Giveaway?

IMG_5037

Hello Friends,

 You are in luck! I am giving you more chances to win this beauty and workhorse of a machine! Here’s how: Whatever means you use for social media, refer or tag a friend to my blog, have them leave a comment under the giveaway post and mention your name. For every person that does that, you will get an extra entry. If they follow me on my social media and blog, you will receive an additional entry for that person. How many friends do you have? Go!

Leave A Comment ~ 3

A Day of Thanks and Love

Image

I wanted to take the time to wish you all a very happy Thanksgiving! Remember, it is not so much about the food as it is about gathering with those that we care about. The food and holiday itself give us a wonderful reason to gather around the table and give thanks for the blessings in our lives.. big and small. So if your gravy turns out a little lumpy, your turkey a little overcooked… remember your guests are not there merely for the food, but for your company and friendship. After all, they must be one of your greatest blessings and I can guarantee… you are most definitely one of theirs!

XO,

Jenny

Leave A Comment ~ 0

Tools and Tips- When To Prepare Your Pies

You know how it goes… trying to prepare a thanksgiving feast in one day?! You fret about getting it all done. You have scheduled the exact time you need to put your turkey in the oven, boil the potatoes, start the gravy, and on and on and on. You are on a tight schedule when  you know a large group is coming over for the feast at (insert time here)! 

You got to love the dishes and pies you can prepare ahead of time. But how many days in advance can I bake that pumpkin, apple, coconut cream, etc… pie and still have it taste and look amazing?

I hope these tips will help ease your mind and schedule!

IMG_2017

Lets start with my Hawaiian Inspired Pumpkin pie. If you are making this or any pumpkin pie, you can make it up to three days in advance. Be sure to cover the top of the pie with foil to prevent the pie from drying out and store it in the refrigerator. This particular pie keeps well the longest.

IMG_2708

If you are making a cheesecake, I would keep it in the springform pan it was baked in and refrigerate. You can do this up to two days in advance. I wouldn’t take it out of the springform pan until the morning of the big day. Of course, keep any fruit toppings in a separate container. You can top the whole cheesecake the morning of and put it back in the refrigerator or top the slice just before slicing.

IMG_4311

For fruit filled pies such as apple and berry I recommend you baking them one day before. I like them best when they are not baked more than one day before eating it.  The fruit starts to release juices and the bottom crust gets soggy. I actually like my apple or berry pie better on the second day! These also do not need to be kept in the refrigerator, 

IMG_3012

For pecan pies, you can bake these two days in advance. You don’t need to store pecan pies in the refrigerator. Yay…. we need refrigerator space for all the other food! Make sure you wrap plastic wrap over all the pies to keep them fresh. 

If you did your math, that means you can make your cheesecake and pumpkin pies today! So nice to get a jump start on things and as a bonus… your house will smell wonderful. A prelude to the big day and meal! Your family will be counting the minutes until they can dig into your delicious creations they have been smelling for days. Happy Thanksgiving everyone!

Leave A Comment ~ 1

Appetizer 2 Class recap


IMG_4772

The class ingredients ready to go! We had quite the full, delicious and varied menu. 

IMG_4901

I taught how to make the most delicious sheepherders bread, unlike the tasteless kind you buy at the store. What a difference “homemade” makes!

IMG_5018

Baked and ready to go!

IMG_4912

Preparing the pulled pork for….

IMG_5128

These babies! BBQ pulled pork crostini with an apple slaw. So many good flavors in this one!

IMG_5057

Preparing the spinach salad on cheese crisps. A light and delicious appetizer!

IMG_4865

Oozing cheese fresh from the oven. This is one of my personal favorites! 

IMG_4883

Phyllo dough cheese pouches with a salsa verde. Light, crispy exterior… melted cheese goodness inside… and an incredibly savory sauce on top. Perfection!

IMG_4760

This class is listening intently! Gosh… I wished my kids listened to me this well!

IMG_4921

Baked herbed pita chips. You know you want one!

IMG_4988

I taught not only how to make an amazing hummus, but also how to put together the best hummus platter. You like??

IMG_5173

And last but certainly not least… the best baked artichoke dip served in the shepherders bread we made. It is hard to stop eating this once you start. It is that good! The class rolled out of my home after this delicious and fun night. Once again… thanks to all that came! I don’t know about  you, but I had a blast!

Leave A Comment ~ 0

The Perfect Apple Pie

IMG_4571

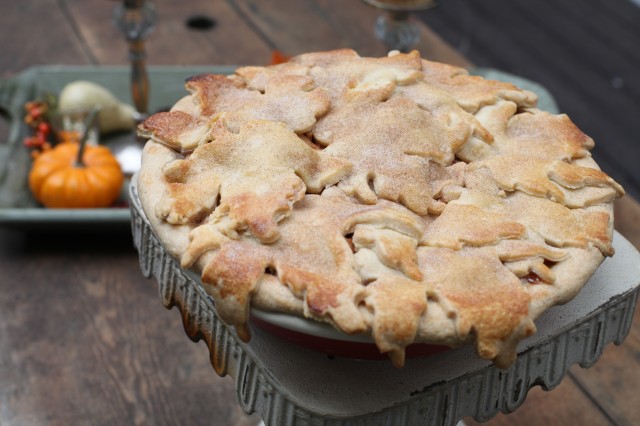
 Here she is… in all her glory. The perfect. apple. pie. I mean that in every way. Not only is it a beautiful sight to behold, but it will knock your socks off with the taste! I think everyone should know how to make a really good apple pie. Now it is your turn to learn!

IMG_3827

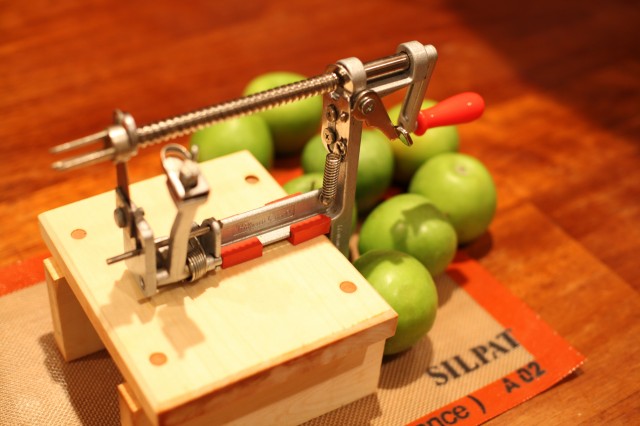
Of course we start off with apples! These here are Granny Smith apples. The apple pie apple. Now to get to the business of preparing these babies for the pie. You have to peel, core and slice them. Yes, it is kind of a lot of work and takes some time. But if you happen to have one of these apple peeler, corer, slicer contraptions… it will be a snap!

IMG_3838

Here we go!

IMG_3843

Ok… hit pause, then rewind and we will go back to the basics for all of you that are feeling teary eyed and left out because you don’t have the nifty apple contraption and just want to give up right here. All you need is a cutting board and a knife. Yay.. we all have that! Ok now we all can proceed. 

IMG_3874

After you chop your apples into thin pieces, you are going to add sugar to them bunch of apple pieces. 

IMG_3890

Next comes the flour. Oh what a difference it makes to add some flour. I like to think of it as the secret ingredient that makes this pie so dang good! Trust me on this one. 

IMG_3902

Of course we will add cinnamon to the party. Apples and cinnamon are like the perfect marriage. 

IMG_3954

Then we will give it a good stir until all the pieces are nicely coated. Just look at that…. you can tell it will be just amazing. 

IMG_4036

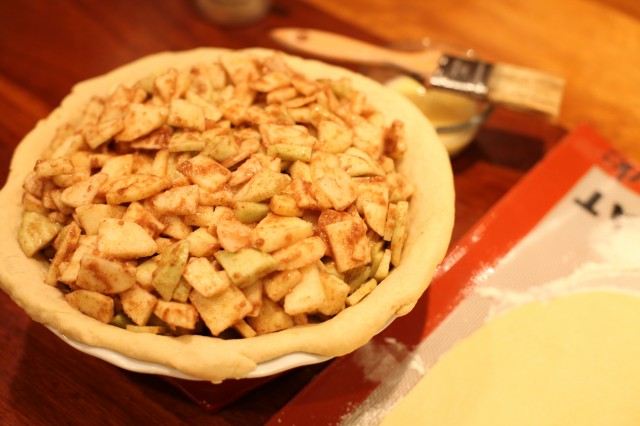
Add the apple pieces into your prepared pie dish. You want to make sure the apple pieces are higher than your pie dish. Why you ask? Because when you bake the apples, they will fall as they soften, and your pie will have a sunken middle if you don’t have an abundance mounding in the dish. A sunken middle is not pretty. And we like pretty!

IMG_4041

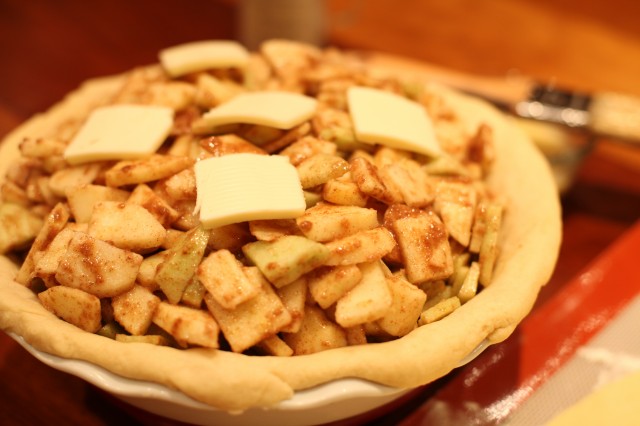
Add five pats of butter on the mound for extra goodness. Butter makes everything better!

IMG_4048

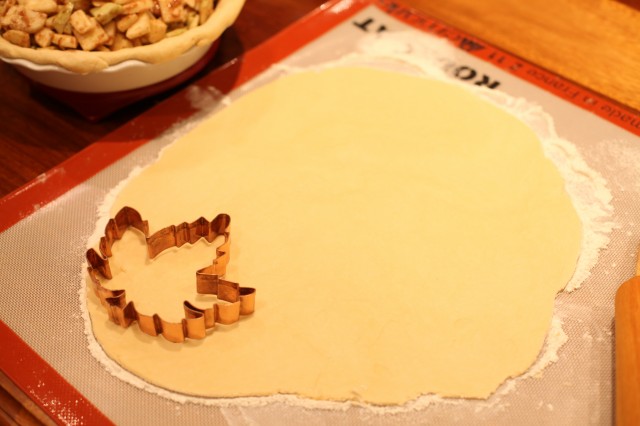
Next comes the “beautiful” part. I use a leaf cookie cutter for the top crust. 

IMG_4050

Be sure not to roll out your dough too thin. Cut out the leaves….

IMG_4052

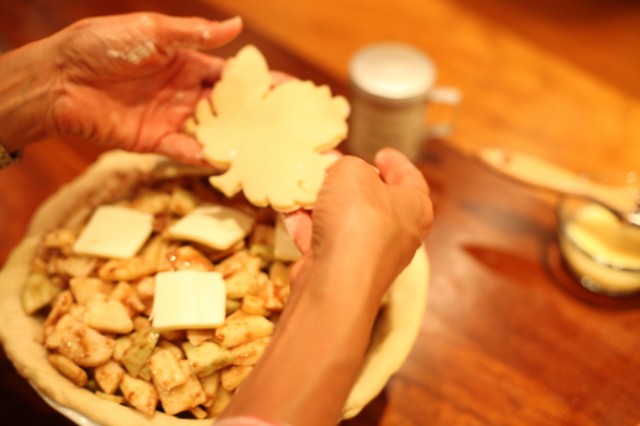
And place them one by one on top of the pie. This is the fun part. I love to “pretty” the ordinary up!

IMG_4067

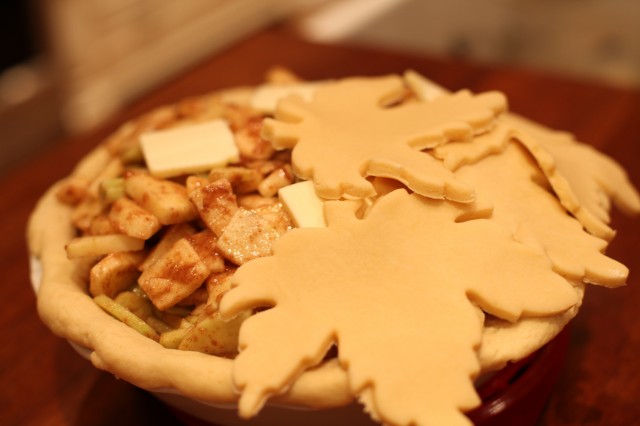
Layer and overlap just so. And of course, let the leaves cascade over the sides. 

IMG_4095

After you get all the leaves on, brush them all with an egg wash. This will ensure the crust will bake a beautiful golden brown. No need to cut air vents on this pie. There are little gaps that act as air vents in between some of the leaves. Yes… I am smart like that. Sometimes.

IMG_4102

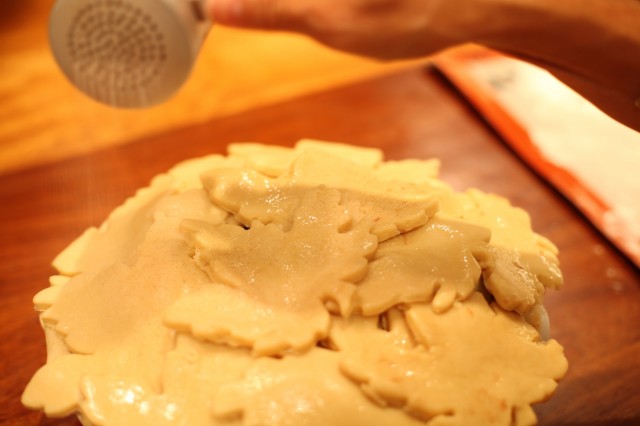
To finish the pie before I bake it, I shake some cinnamon/ sugar all over the top of the pie. For both looks and taste. A double yummy whammy!

IMG_4115

May I take one minute to show off my work? So pretty and it hasn’t even been baked yet! 

IMG_4131

Two important steps right here. Number one… place the pie on a foil lined rimmed jelly roll pan. This apple pie will bubble over sticky juice and this pan will save the bottom of your oven. And covering the pan with foil will save you major scrubbing to clean the very sticky and over baked juice. Second, lightly tent the top of the pie or those beautiful leaves will turn a nasty dark brown or burn. Oh the horror… not to our pie!

IMG_4132

After about 1 hour and 45 minutes, pull the pie out and remove the tent. Be gentle just in case some of the crust is sticking to the foil. 

IMG_4133

Cover just the sides of the pie with wide strips of foil, leaving the middle exposed. Finish baking for about 25 minutes. When you see the juices bubbling out of the pie, it is a sign that the apples are cooked all the way through. Oh yes… it is a good sign… a very good sign. 

IMG_4365

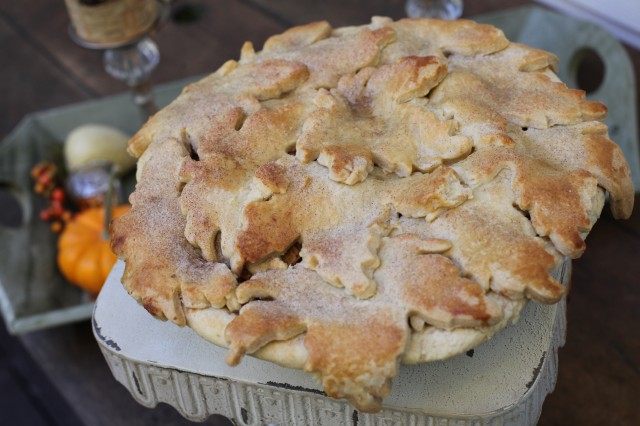
And there you have it! Now have you ever seen a more beautiful apple pie? And I dare you to find a more tasty one too. Beauty and taste…. we have a crowd pleasing winner! For the full recipe, click here. Happy apple pie baking my friends!


Leave A Comment ~ 2

Another Bosch Mixer Giveaway!!

IMG_5037


I know…. You must be beyond excited!! Time for the happy dance!  This is happening again thanks to Pleasant Hills Grain who is going to ship this all time favorite kitchen appliance of mine to one very lucky person! I love this company and they offer so many great products and are so great to work with. Whenever I have an issue, they have always been happy to do what they can to make me happy. 

For those of you that are not familiar with the Bosch mixer, let’s just say it is the Rolls Royce of stand mixers! I had a professional series KitchenAid and it just could not keep with my baking needs. After 2 frustrating months, I got rid of it and bought this baby from Pleasant Hills Grain. I can mix and knead until the cows come home and it never overheats or gives up on me. So… yes… you could say it was beyond love at first “use.” This is a most permanent relationship. I love, love, love this mixer! I cannot endorse it enough. 

I will announce the winner of this giveaway in three weeks. Saturday, December 14th to be exact! But don’t wait to enter… this is too important to procrastinate. Go now and here’s how!

1. Follow my brand spanking new instagram account jennyevansgatherings (I will be posting daily about food finds, products, eats, gatherings or inspirations from my food world.)

2. click on the pin, facebook and tweet buttons above

3. Follow my pinterest board (Jenny Evans)

4. repost on your instagram and tag @jennyevansgatherings

5. Sign up for my newsletter to receive my emails if you haven’t yet

6. And don’t forget to leave a comment below with your name and email and tell me what you did so I know how many entries to count for you!

So, that is up to 6 entries you can have! I want to give you as many chances as I can. Good luck! 

Leave A Comment ~ 118

Tools and Tips, Pie Tutorial #5

Today’s tips will be help you bake pies without burning or ending up with an overly baked outer crust. How is it done you ask? 

IMG_3589

There are two ways  you can shield your crust from overexposure of heat while baking. The first is to buy one of these pie shields. They really are great, but they are a one size only and in this case…. one size does not fit all. What to do?

IMG_3598

Here is where simple foil comes to the rescue. I cut them into 2 inch thick strips. 

IMG_3600

Carefully wrap the strips of foil around the crust. Be careful you don’t mar the crust in the process. A light touch is best. 

IMG_3605

Go all around the  pie making sure not to leave any exposed parts. No pie flashing!

IMG_3621

Usually I have filling in my pie at this point. Make sure to keep the foil off the filling or it will bake into it and stick to the pie. It is not pretty to rip off.  Remove the foil around five minutes before the pie is finished baking to ensure a nice golden crust. And there you have it! Are you just itching to make a pie? I hope you give it a try this Thanksgiving. It will be a snap with my tips!

Leave A Comment ~ 0

Me and Pillsbury!

IMG_5028

Me and Pillsbury?! Really?? Really! That’s me up there in their article they are featuring for the holidays. How does this happen you ask? Well… this is the low down. Is that gangsta talk? That I am definitely not, but you know what I mean. 

One day out of the blue, I get an email from the associate managing editor for Pillsbury asking if they can feature my website in their article and use my decorative pie cut out image and link to my site. Uhhhh…. yes! So here we are. Up there. And I am smiling. 

Check out the whole article here.

Leave A Comment ~ 2

Appetizer 2 Class with the Lunch Pails and Lipstick Gals

IMG_5184

 Lisa and Summer from Lunchpailsandlipstick came to my Appetizer 2 class last week and we had a yummy-licious time! They picked two of their favorite appetizers they are featuring on their blog. Lucky you…. this time I will be sharing not one, but two recipes from this class. You should thank these two gals for that! 

IMG_5098

The first of their favorite appetizers is the Spinach Salad on Cheese Crisps. It is a light parmesan cheese crisp topped with a delicious Spinach Salad. Let’s take a quick walk through the process. 

IMG_4879

I used my microplane to finely grate fresh parmesan cheese and placed the mounds on a parchment lined baking sheet. As they bake in the oven, they become these light and airy crisps. They are such a great and tasty alternative to bread or crackers. 

IMG_5046

Next, I made a simple chopped spinach salad. This is pre-dressing of course! We tossed it in a delicious sweet and creamy balsamic dressing. 

IMG_5051

I suggest laying the cheese crisps on your serving platter before you assemble them. 

IMG_5082

Place a small mound of the salad on each crisp. Top each mound with some chopped, crisped bacon and an avocado wedge. Lot’s of great flavors going with these gems!

IMG_4949

The hummus I taught was a favorite of most everyone in the class! Hummus is so easy to make! You just need to combine the right ingredients to make it out of this world good! I use my food processor but you can use a blender too. 

IMG_4941

Only fresh herbs and ingredients in here!

IMG_4964

After a whirrrrrr….. there you have it…..hummus!

IMG_4968

I showed the class how to make a beautiful hummus platter. First start out with a wooden board or platter. I used hollowed out bell peppers to hold the hummus, but you can also use any bowl. Make sure you pick bell peppers that lay flat on the bottom. Some are misshapen. Now that won’t do!

IMG_4973

Fill the peppers with hummus.

IMG_4982

Lay your veggies and pita chips around the Hummus, making sure to lay different colored vegetables next to each other (Don’t put green veggies next to other green veggies. Get it?) Did you notice the beautiful colors of my carrots? They are heirloom carrots that you can find at your local grocery store or Trader Joes. They come in a package with red, yellow, orange and sometimes purple carrots. They are beautiful and tasty. I scrub mine real good, slice off the tops and bottom and cut them into sticks. I don’t peel them. I like the rustic look of the skins. Who wouldn’t want to dive into this? It will be the star of the party for sure! For the full recipes click here and here.

Be sure to visit lunchpailsandlipstick to check out their post. They are also offering an awesome Williams Sonoma giveaway! Click here to find out the details to enter. Good luck and bring on the parties!

Leave A Comment ~ 1

Breakfast Class 2

Friday December 6, 2013 – Friday December 6, 2013

31801 Via Perdiz

View MapMap and Directions | Register

Description:

IMG_3802IMG_4692IMG_4217IMG_4683IMG_4713IMG_4219

Hello Friends,

I know many of you will be excited to hear I am teaching another breakfast class!  I heard from many of you that my last breakfast class was a favorite of yours and the recipes are used time and time again. I think the holidays is a perfect time to teach these amazing dishes to you. These are so good, I am sure you will want to serve some of them for your Christmas or Holiday breakfast.

Let’s get right to the menu! The breakfast dishes I will be teaching you are: A Stuffed Pumpkin French Toast with an Oat Crumb, A Banana, Chocolate, Macadamia Nut Scone with a Vanilla Icing, A Lemon Blueberry Scone with the Perfect Lemon Icing, Decadent Breakfast Potatoes, A Breakfast Crostata with Spinach and Sun Dried Tomatoes and A Huevos Rancheros Crostata. It is a full and amazing menu I know you are going to obsess about.

Can I tell you something? I have never liked scones. I have tried scones a countless number of times from different amazing bakeries, only to be disappointed once again with the dry texture. They just never gave me the satisfying, “this is oh so good” eating experience. And I expect that when I am eating a baked good of any sort! Well…. I never liked a scone until I made some of my own. Oh wow… I really mean OH WOW! You will flip over these babies!

And the french toast? You are going to die over this one! I took french toast to a whole other level. It instantly became a family favorite! The best part of these recipes are the ease of them. After all, the last thing we have time for during the holidays is a complicated dish. No worries… I have you covered. And be assured… these are all some serious crowd pleasers!

My limit for each class is 16 people. I first demonstrate how to make all the dishes and then we feast! So come hungry! The cost of each class is $60.00 per person. *Please note the price change. Let me know if you are interested and I will contact you with more information about the class and tentatively put your name on the reservation list. When I receive your check, I will reserve your spot (31801 Via Perdiz, Coto de Caza, CA 92679, Checks made payable to Jenny Evans). My classes are filling up really fast so please let me know if you are interested before you send me a check to make sure there is an open spot. For cancellations, I require a “10 days before the class” notice for a refund.

I have had a lot of requests for private classes. I have taught gatherings for birthdays, couples classes, or just someone that wanted to learn a past menu and got a group of friends together to learn. I love doing these party- like classes and talk about a good time! Please feel free to contact me anytime if you are interested in doing such a class. I require 16 people for a private class.

Anyone is invited to attend, so please feel free to forward this on to your friends, neighbors and family. I hope you can join me for another gathering of delicious food and a fun night!

I am excited to announce that my Gatherings….. for the love of food website/blog is up!! The website address is jennysgatherings.com. I have a new recipe from my last class posted in it so check it out! Be sure to tell all your friends to visit me on me my blog!

Happy Cooking!

Jenny Evans


Register

Leave A Comment ~ 0